Reverse Engineer Obsolete Parts with 3D Scanning

(As Featured in Manufacturing Engineering Magazine)
DISCOVERING THAT A KEY SUPPLIER is discontinuing production of a critically needed part is something no manufacturer likes to experience. Indeed, “part obsolescence,” wherein a previously available part is permanently dropped, can bring a world of headaches. Dealing with such challenges is one aspect of obsolescence management (OM), the range of tasks focused on anticipating and addressing the loss of items critical to continued production.
Manufacturers faced with discontinued or deteriorating parts have some standard OM options available, including executing a “bridge buy” (purchasing a large quantity) of the part while stocks remain or purchasing the part on the secondhand market. However, these options can be costly and competitive while courting the risk of purchasing too many (or too few) parts.
Fortunately, there is another option that lets the manufacturer reproduce the obsolete part when needed and in the desired quantity: reverse engineering using 3D scanning.
 3D scanning is a non-contact, non-destructive method of digitally collecting measurement data on the shape, size and even texture of a real-world object. It creates detailed digital 3D models that can be used to reverse engineer legacy parts, averting the need to purchase replacements. Superior in accuracy to traditional measurement techniques such as calipers and other hand tools, 3D scanning can provide welcome insurance against the loss of essential parts.
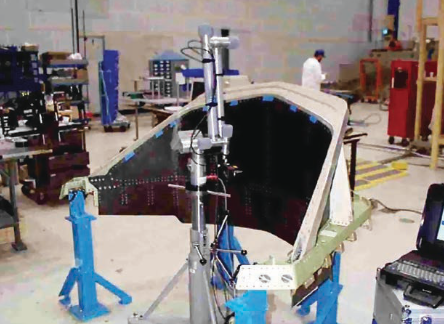
There are multiple types of scanners, including laser triangulation, projected light, time-of-flight, large-area and X-ray computed tomography (CT). Each has specific capabilities that may make it more suitable for particular applications and, in some situations, more than one type of scanner may be required to achieve optimal results. The accuracy of 3D scanners is matched by their versatility—they can collect enormous amounts of spatial geometry from objects of virtually any size and shape—from the exterior of a fighter jet to extremely small parts such as a fiber optic connector.
One of the more versatile devices is NVision’s HandHeld laser scanner, which has applications across the manufacturing spectrum. It can collect 60,000 separate spatial measurements per second with an accuracy of 25 microns—about one-third the thickness of a human hair. (CT scanners and traditional touch-probe coordinate measuring machines (CMMs) are even more precise, with accuracy to 2.54 microns.)
 As an engineer guides the HandHeld laser beam over the object’s surface, the scanner, using XYZ coordinates with IJK vectors, creates a dense “point cloud” with data on the spatial location of every point on the surface. Design engineers then utilize specialized software to create a design-intent, vendor-neutral CAD model importable to all CAD packages or a native CAD model with full-feature tree, allowing manufacturers to reproduce and/or modify the part themselves.
The following real-world manufacturing applications illustrate 3D scanning’s utility in addressing the obsolescence of vitally needed parts:
- A North American maker of industrial and commercial water purification systems that rely on flow control and monitoring was faced with an expensive revamping of a popular system when the Manufacturer of the system’s control box discontinued production. Because the current box was popular with customers, the manufacturer decided to reproduce it themselves. Lacking a CAD design file for the box, the company asked NVision to scan an existing unit. We provided a native CAD file, which the company used to reproduce the part themselves.
- A semiconductor manufacturer faced a production shutdown when some of its suppliers could no longer provide replacement parts for its aging production equipment. After reverse engineering the parts with 3D scanning, the manufacturer now regularly reproduces and reinstalls the discontinued parts as they age.
- A soft drink manufacturer wanted to redesign an old, but essential, tool used in the production of its flagship beverage. A non-existent CAD file was necessary to do the redesign, so the company asked NVision to scan the tool. After scanning the part with a HandHeld scanner, we used a traditional touch-probe CMM to further fine-tune the data and increase the accuracy of critical features such as the internal diameter, external diameter and very small details. We were able to quickly provide the accurate CAD file the company needed to reverse engineer, manufacture and reinstall the tool to keep production running.
Given its ability to accurately digitize aging and obsolete parts for reverse engineering, 3D scanning merits a prominent role in manufacturers’ OM strategies. Contracting with a company that has expertise in reverse engineering to native CAD can significantly extend the life and improve the performance of viable parts otherwise tagged as “obsolete.”
