Industrial Manufacturing

Manufacturing has undergone dramatic and significant changes in recent decades. While much remains the same--assembly lines still hum and stamping presses still stamp--the modern job shop and factory now increasingly rely on advanced technologies to improve product design, maintain quality control, conduct defect analysis, and improve production efficiency and time to market. Chief among these modern technologies is 3D laser scanning. In ever greater numbers, manufacturers are taking advantage of the huge cost and time savings that can be achieved by switching from traditional manual measurement techniques to laser scanning in performing geometric measurements.

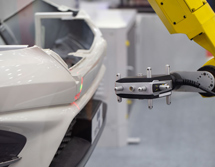
Laser scanning works by projecting a line of laser light onto the surfaces to be measured, while a camera continuously triangulates the changing distance and profile of the laser line as it sweeps along. A computer translates the video image of the line into accurate 3D coordinates of the object’s geometry. Soon a “point cloud” consisting of millions of such coordinates, each with its own set of X, Y and Z coordinates, is created. The point cloud contains all the geometrical surface data of the object. The scan data is used to create a parametric solid model and the resulting Computer-Aided Design (CAD) file can be used for inspection/measurement, design refinement, reverse engineering, and production.

Our laser scanning and engineering services provide manufacturers with ultra-accurate 3D CAD files of as-built legacy and other parts and assemblies. We can deliver full surface models of scanned components together with deviation data to highlight any differences between the as-manufactured parts and the original design intent.

Manufacturers reap the benefits of scanning through increased production efficiency, higher quality products, and faster time to market. Whether you make small components for medical devices, large parts for heavy machinery or production equipment, or anything in between, laser scanning can be a game-changer in today’s competitive supply chain.

How can our laser scanning/reversion engineering services help you? Here are just some of the ways:

Create CAD Models for Reverse-Engineering, Inspection, Redesign, and Reproduction

Our laser scans will provide you with CAD models--exact digital duplicates--of your parts and equipment. You can then view your as-built part or assembly in 3D virtual form, allowing for easy inspection, measurement, comparison, and reverse engineering. Our CAD models can also be used to optimize or otherwise alter the original design of a part. In cases where parts are lacking original design/dimensional documentation, our CAD models constitute a perfect model of the as-built object, which you can use for reproduction.

Determine the accuracy of parts alignment and the fit of accessories

All machinery, no matter how expensive or sophisticated, can lose alignment over time. These shifts can be highly significant as they can negatively impact the function and durability of the parts produced by the machinery. Our laser scanning precisely captures even the most complex surface geometries, enabling you to more accurately inspect and improve the dimensional accuracy of your product. This is especially helpful if your product is one that is hard to measure accurately. For example, NVision was contacted by a heavy equipment manufacturer for the construction and mining industry whose goal was to improve the dimensional accuracy of its products---buckets, teeth, edges and other ground engagement tools. Measuring these tools is challenging because of the complexity of their shapes, tight dimensional tolerances and harsh manufacturing environment. Inspection is difficult even with Coordinate Measuring Machines (CMMs) because of the large number of points that need to be captured to fully inspect a 3D surface. Hard-gauging measurements aren’t a viable option either--teeth produced for earth moving equipment typically have organic shapes that are difficult to measure because they have relatively few flat surfaces that can be used for traditional gauge measurements.

NVision engineers were able to measure the company's tooling and finished products with a higher degree of accuracy than was obtainable with either CMMs or hard-gauging and generated complete 3D geometry at all stages of the product development process. After evaluating the geometry and making appropriate changes, the manufacturer significantly lowered its reject rate and improved its ability to hold close tolerances.

Create a “virtual” model to use in testing and refining heavy equipment/vehicle components

By using a combination of laser scanning for complex geometries, laser tracking for simple, large-scale measurements, and a mechanical digitizer, we can provide you with a highly accurate, solid geometry assembly for use in multibody simulations to evaluate the performance and durability of your components. Eliminate weeks or even months of physical testing and avoid the time necessary for a CAD operator to create a simulation model from other sources, which often include error-prone hand measurements and 2D designs.

Reduce “time to market” while requiring fewer physical prototypes

The ultra-accurate and promptly created CAD file we deliver can be used to refine the design of your components at an earlier stage in the development process, greatly reducing time to market while also requiring fewer physical prototypes. For large parts and equipment, a CAD operator will normally need several months to create a simulation model (often, as mentioned above, working from flawed measurement data). Alternatively, our technicians can model your large parts much faster and more accurately using the latest laser scanning and laser tracking technology.

Improve and accelerate the Inspection process

With its ability to quickly collect enough data points to fully define complex contours, laser scanning can dramatically improve the process of inspecting tooling, molding, and other complex components. The time savings alone are striking: laser scanning can often provide a complete inspection in a matter of a few hours, saving manufacturers the weeks of time required by other inspection methods, including CMMs. On a recent project, we helped a local manufacturer improve quality by generating a color plot that showed exactly where its mold differed from the original CAD file, making it easy to evaluate the mold against the customer’s requirements and make necessary repairs.

Speed production and collaboration with manufacturing partners

Eliminate shipping time by electronically sending/sharing the digital CAD file of your scanned part with your manufacturing partners. This facilitates improved design and production collaboration, a significant competitive advantage when it comes to getting to market faster with a better product.

With its ability to capture the precise physical geometry of a product and then create a CAD file of the part, NVision’s 3D laser scanning and reverse engineering services offer industrial manufacturers the prospect of improved product designs, faster and more efficient development and production, greater quality control, and faster time to market.

For over three decades, the NVision name has been synonymous with quality work. Our experience in the industrial manufacturing industry shows...in the results we deliver and the customers we keep. Our clients include Yamaha, Weatherford, Molex, SwRI, Toyota, Porsche, Volkswagen, Daimler-Chrysler, Hallibuton, other industry leaders.

Please contact us by phone (817.416.8006) or email (sales@nvision3d.com) to discuss your 3D Scanning/Measurement needs.

Manufacturers reap the benefits in increased production efficiency and faster time to market.

yamaha

Manufacturers reap the benefits in increased production efficiency and faster time to market.

weatherford

Manufacturers reap the benefits in increased production efficiency and faster time to market.

molex


swri